
Corned Beef and Cabbage with Carrots, Onions, and Potatoes
One of my favorite meals I remember my mother making was her traditional corned beef and cabbage. We didn’t have it often, but I could always count on Debby cooking up a pot and smelling up the kitchen for Saint Patrick’s Day (although the dish may or may not have any relation to Ireland). When I started cooking for myself I could always count on boiling a big old hunk of corned beef brisket procured from my local supermarket.
Corned Beef seems to have its roots more with Jewish immigrants than Irish ones – And sure enough, my Jewish Father-in-Law goes out of his way to find good corned beef (whisper the word “Deli” to him and stand back to watch the fun!) When we would celebrate Hanukkah prior to celebrating Christmas, corned beef was always at the table, usually procured from one of the main Delis of New York.
Enter the Michael Ruhlman book Charcuterie and corned beef in my life took on a whole new light – What, I could actually corn the beef myself at home? No more dealing with those slimy, smelly pieces of vacuum-packed beef I buy at the market? And I can season them to the way I like? Awesome!
So I set off to follow his recipe, which was pretty darn good – Better than most Delis (yes, even many New York ones), and light years away from the final product received from store-bought. The next Holiday season, I brought my own corned beef to the Hanukkah table and the family LOVED it.
Now that I knew I could do this at home, and do so EASILY (Yes, it is extremely simple – though it takes days to cure), I needed to go about tweaking the recipe to further refine it to my tastes. First, the seasonings – I bumped up the garlic quite a bit (and everyone who either knows me or even just sits next to me knows, I LOVE garlic!), and even added extra pickling spice. I have not yet assembled my own pickling spice, and Ruhlman has a recipe for that as well, but in the meantime I just use the supermarket variety and add MORE. Ruhlman brines his brisket for Five days – I tend to leave it in closer to ten – Alton Brown is fond of the latter. Seeing a pattern here? Yes, I like my corned beef STRONG – Maybe it is due to too many years subjected to the bland stuff, but I like mine as I like my jokes – VERY CORNY!
Feel free, of course, to adjust to your liking. If you were to adjust anything, I suggest using less seasonings and still brine it for close to, if not, ten days. My last corned beef was only in the brine for five and I noticed spots where the brine had not completely entered. It was still good, but it was perhaps my least favorite of the corned beefs I had done.
A word on Salt – Corned beef is Brined, so alot of salt is used but most ultimately gets thrown out. I never add more salt than is called for, only the seasonings. In addition, I use “Pink Salt” - Aka Sodium Nitrite (also known as Curing Salt or Prague Powder.) In large amounts this can be bad for you, but I use hardly any and much is discarded with the Brine. You can do this dish without it, but pink salt will help cure it as well as help give the corned beef its rosey color. Most bacon and sausages already contain pink salt, and if you come across any natural brown-ish or gray-ish Bacon, it most likely was cured without. You can find sources for pink salt on my links page.
The recipe is based on around 5 Lbs of beef brisket, which usually means 2 pieces. I try to find inexpensive natural beef, but if I cannot I’ll buy it at a upscale market, and a supermarket if the prices are too high there. I once did a test of this recipe with brisket from both the supermarket and a higher-end market and results were the same despite the supermarket’s beef being much cheaper. I’ll look for a cut that is uniform in shape (for both even brining and cooking) as well as having a nice layer of fat on top for flavor.
One hint – Since you don’t want to put the brisket in a hot or warm brine, do yourself a favor and make the brine the day BEFORE you want to start brining the meat – So ideally, you want to start ELEVEN days ahead of when you are planning to use it. For me, the next round will start around March 6th to be ready for the 17th.
You can use a brining bag or a suitable container to hold the brine and the brisket - A large tubberware container would even work if you can find one large enough. Consider going to your local restaurant supply store to pick up 2 or 3 different sized platic containers with lids – You will continue to find uses for them long after using them to brine in. The good ones also have measurements on the sides, making it very easy to measure out quarts, gallons, and liters.

The Brisket after being Brined in a 12-quart Tub.
RECIPE – BRINING
5 lb Beef Brisket
1 gallon cold water
2 cups Kosher Salt
1 oz Pink Salt
1/2 cup Sugar
1 large head of Garlic, peeled
4 Tablespoon Pickling Spice
1 teaspoon Red Chile Flake
Fill a large pot with the cold water and set on the burner to boil. Assemble all of the ingredients and chop the garlic. A kitchen scale isn’t imperative for the pink salt, but it can really be a useful tool. Add the kosher salt, pink salt, sugar, garlic, and pickling spice into the water and stir. Bring the water up to a boil, then take off the heat and cool and refrigerate.
The next day, add the brisket to the cool brine and keep submerged. If using a container, weigh down with a heavy plate, canning jar, etc. Ensure all of the air is removed if using a brining bag. Store the brisket in the Fridge, and every couple of days, stir the brine and rotate the meat.
RECIPE – COOKING
2 or 3 Tablespoons Pickling Spice
Any combination of Carrots, Onions, Red Potatoes, and cabbage
Ten days later, take out the brisket, rinse briefly, then put in a large pot of cold water with the pickling spice. Bring up to a boil, immediately turn down the heat, and simmer for 2-1/2 to 3 hours until tender.

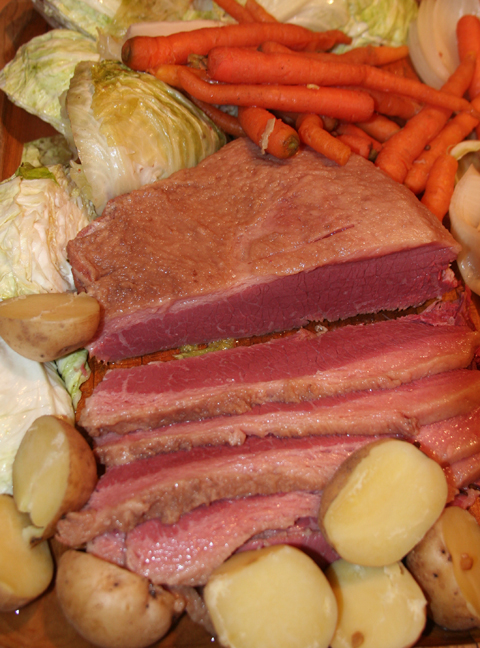
Cabbage is a Given - But add whatever you want!
Take the corned beef out of the pot, put on a plate or platter and tent loosly with foil. Add vegetables – Put in large pieces first, smaller ones after 10 minutes. I’ll usually halve the carrots and onions, quarter the onions, and cut the cabbage into wedges – But you can certaily cut everything into finer pieces if you like. Cook until tender, 10 minutes or more. I usually prefer red potatoes over yukons for this dish, but everything you see I picked up at the Farmers Market in February with two feet of snow on the ground! With that much effort on the part of the Farmer I had to use what I found….
Slice the corned beef and serve with the vegetables. I’ll usually spoon a bit of the liquid from the pot on top to keep things nice and moist and serve with condiments of your choice – Mustard, Horseradish, Guiness Beer, etc…
If you want to slice some corned beef for sandwiches, Wait until the next day as it will slice better cold. You can store everything together in the fridge and even save some of the liquid as well – Corned beef tends to dry out, so you want to do everything you can to prevent that. I’ve even frozen slices of corned beef – I’ll freeze some of the liquid first, then chop a hunk off and add to the package before freezing the beef. The liquid will both moisten and flavor the corned been when defrosted and warmed.
I guaranteed that any Corned Beef lover will appreciate the homemade recipe – And you may even win over some that have never liked the dish!